How to Remove Duplicates in Excel
Duplicates in Excel spreadsheets are more than just annoying—they can skew your calculations, mess up your reports, and make data analysis a nightmare. Whether you’re cleaning up a customer list, inventory data, or survey results, removing duplicates is a critical skill.
The good news: Excel has a built-in tool to find and remove duplicates quickly. The bad news: it’s easy to accidentally delete important data if you’re not careful. Follow this step-by-step guide to clean your data safely.
When You Need to Remove Duplicates
Common scenarios where duplicates sneak in:
- Importing data from multiple sources (e.g., combining two customer lists)
- Manual data entry typos (e.g., "John Doe" and "Jon Doe")
- Accidental copy-paste errors
- Duplicate rows in large datasets
Before You Start: Critical Preparation
Always do this first! Before removing any duplicates, create a backup of your data:
- Right-click your worksheet tab (at the bottom)
- Select "Move or Copy"
- Check "Create a copy" and click OK
- Rename the copied sheet "Original Data" (so you can revert if needed)
This safety net prevents permanent data loss if you make a mistake.
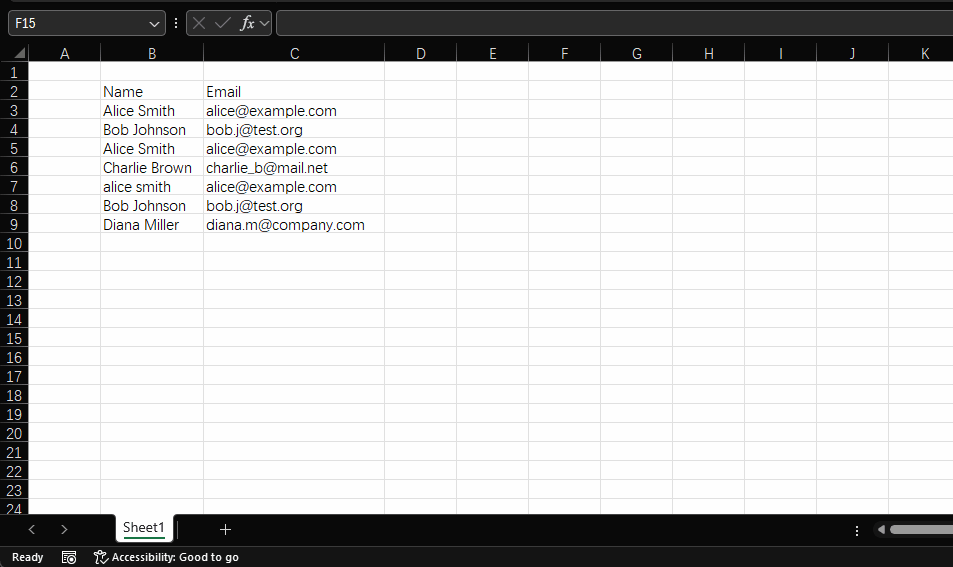
Step 1: Select Your Data Range
- Click any cell in your dataset
- If your data has headers (like "Name", "Email"), select the entire range including headers
- If no headers, just select the data you want to check
Pro tip: Press Ctrl+A (Windows) or Cmd+A (Mac) to select all contiguous data
quickly.
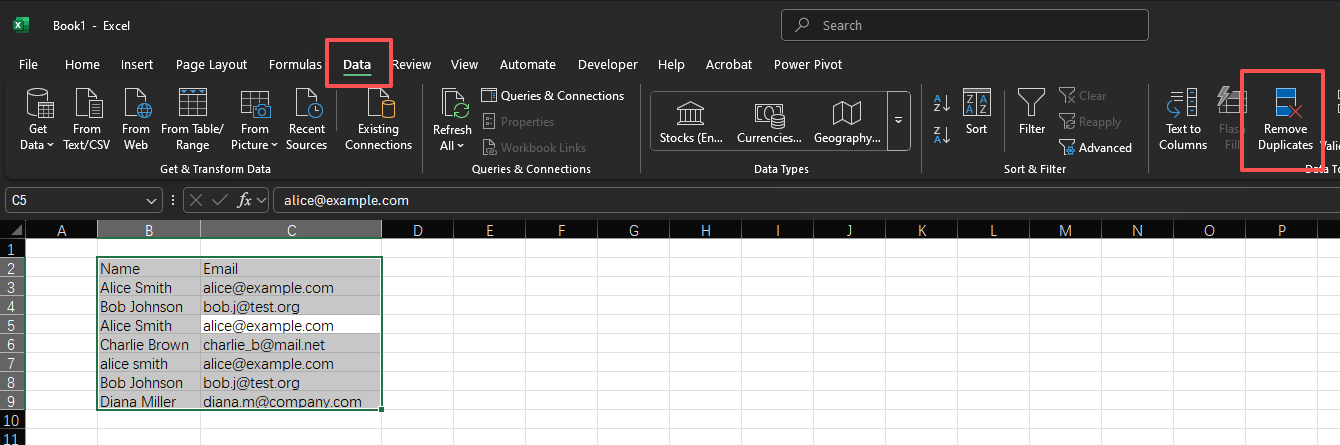
Step 2: Open the Remove Duplicates Tool
- Go to the Data tab in the ribbon
- Look for the "Data Tools" group
- Click the Remove Duplicates button (it looks like two sheets with a red X)
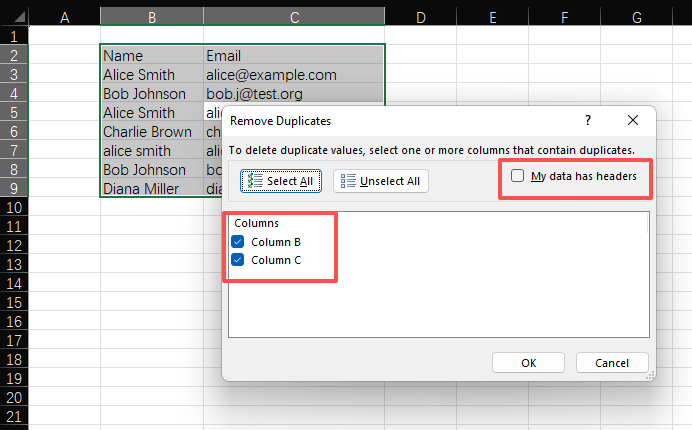
Step 3: Configure Your Duplicate Settings
A pop-up window will appear with two important options:
My data has headers
Check this box if your first row contains column names (like "Email" or "Product ID"). Excel will exclude this row from duplicate checks.Columns to check for duplicates
By default, Excel checks all columns for duplicates (a row must match exactly in every column to be considered duplicate).Customize this by:
- Unchecking columns that don't need to be unique (e.g., "Quantity" might have duplicates intentionally)
- For most lists, checking just the critical unique identifier (e.g., "Email" for customer lists)
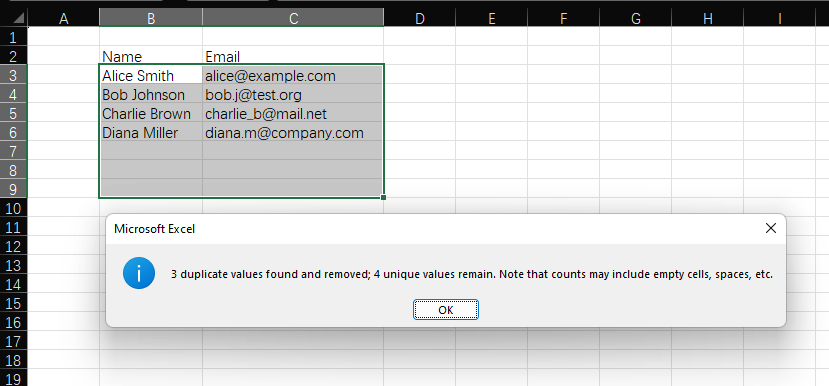
Step 4: Remove the Duplicates
Click OK to start the process. Excel will:
- Show a message telling you how many duplicates were found and removed
- Keep the first occurrence of each duplicate entry
- Highlight the remaining unique values
Example result message: "3 duplicate values found and removed; 4 unique values
remain. Note that counts may include empty cells, space, etc."
What to Do If You Remove Too Much
If you accidentally remove important data:
- Go to your "Original Data" backup sheet
- Copy the lost data (Ctrl+C / Cmd+C)
- Paste it back into your working sheet (Ctrl+V / Cmd+V)
- Repeat the process with adjusted column settings
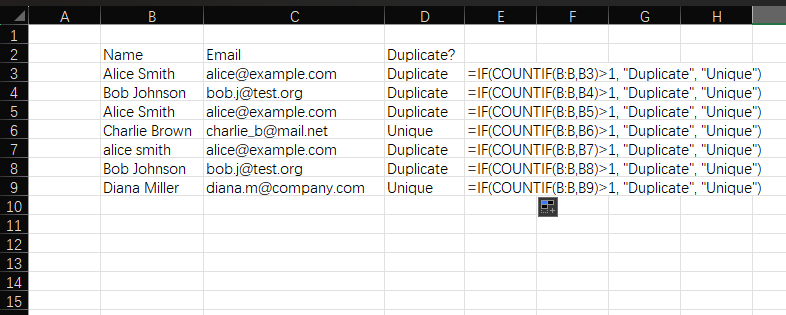
Advanced: Find Duplicates Without Deleting Them
If you want to identify duplicates without removing them (to review first):
- Insert a new column next to your data (call it "Duplicate?")
- In the first cell (below the header), enter this formula:
(Replace A:A with your column range, and A2 with the first data cell)=IF(COUNTIF(A:A, A2)>1, "Duplicate", "Unique") - Drag the formula down to apply to all rows
- Use filters to sort and review duplicates before deleting
For Google Sheets Users: Quick Comparison
The process is nearly identical in Google Sheets:
- Select your data
- Go to Data > Remove duplicates
- Choose columns to check
- Click "Remove duplicates"
Google Sheets adds a nice feature: it shows a preview of which rows will be removed before confirming.
Final Tips for Clean Data
- Check for partial duplicates: Excel won't catch "JohnDoe@gmail.com" and "john.doe@gmail.com" as duplicates—clean text formatting first
- Use conditional formatting: Highlight duplicates temporarily with Home > Conditional Formatting > Highlight Cells Rules > Duplicate Values
- Automate with Power Query: For regularly updated data, use Data > Get & Transform Data to create a reusable duplicate removal process
Have a problem with Excel or Google Sheets?
Tell us about the issue you're facing, and we'll create a step-by-step guide for it.